
©Tebee – all rights acknowledged
The inspiration for the resurgence of my modelling bug was seeing an article on a blog about a freelance 009 Sentinel steam tram loco body that had been designed to fit the inexpensive Kato 11-103 tram chassis.
This tram body, by Tebee, was available to buy from Shapeways.com, the on-line 3d printing service.
This was the trigger for an inexpensive model I thought …… little did I know how untrue that was!
The ‘problem’ was that being somewhat of a computer geek I decided that I would try and make this diminutive loco run under DCC control with lights etc.
This was my ‘downfall’ because now I have several DCC controlled locos, Digitrax controller and computer control by use of the free JMRI Decoder3 DCC control software …. but that is a story for another day.
My copy of this loco, in HD plastic, was ordered from Shapeways at a cost of about £30 and the Kato 11-103 chassis from Amazon for about £17.00.
Delivery was about 2 working weeks from Shapeways and 24 hours for Amazon!

3d printing speeds are going to need to be a lot faster if they are to compete I think.
As part of this build I also ordered some 2mm warm white LEDs and 1.0 KΩ ballast resisters and a Digitrax DZ125 2-function DCC decoder, one of the smallest on the market and with a higher current capacity than the Lenz Gold Mini etc.
I now awaited the delivery from Shapeways and when it arrived I was pleasantly surprised by the amount and quality of the packaging.
The model was clean and had a fine, almost ‘sandblasted’, finish to the plastic with very little striation in the panels apparent.
Work was now in progress. I have not undertaken such fine detail work for 40 years!
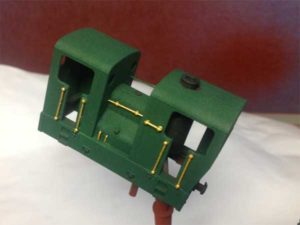
As a start I drilled this very fragile kit to fit Nairnshire Modelling Supplies short handrail knobs and 0.45mm brass rod.
Once the handrails were fitted it was time to adapt the Kato 11-103 chassis to fit the body and to install the Digitrax DZ125 DCC decoder.
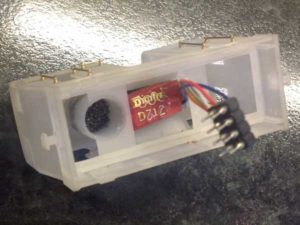
Before that work was done Liquid Gravity pellets were set into the water tank and boiler, using CA (CyanoAcrylate) glue, to add some much-needed weight to this diminutive model. To facilitate this the top of the boiler was blocked from the chimney using a disc of Plastikard and bulkheads fitted to the ends of the water tank mid-section.
Care was taken to ensure that there was enough room to fit the Digitrax DZ125 decoder chip within the water tank above the Kato chassis.
The Kato 105 chassis was modified by removing the n-gauge couplers and opening up the holes in the chassis to allow me to embed a 3-pin micro plug so that the body can be easily separated from the chassis and DCC decoder without disturbing the wiring in the body for the lighting .

The next job was to fit front and rear 2mm Warm white LEDS to the front and rear cabs. The front was left white whilst the rear was later over-painted with Tamiya Red acrylic varnish, some I had left over from modelling 30+ years ago! 1KΩ resisters were wired onto the negative pins of each LED. All wiring to the LEDs was insulated with heatshrink tube.
Once the LEDs were in place they were coated with masking fluid and the model went off to the paintshop to be firstly undercoated with Halfords red-oxide acrylic primer and then airbrushed with Vallejo Black Green acrylic and several coats of Vallejo satin varnish.
The reason for choosing red-oxide primer over grey or white was that you get a more intense green for using a red undercoat.
Handrails were picked out with Vallejo acrylic gold and the chimney cap ‘coppered’ with a mixture of gold and Vallejo red-oxide primer. All the paints for application had to be thinned with 50% Vallejo thinners for easy spraying. Several coats were built up before I was satisfied as to the density of colour.
The model was then assembled and weathered and a pair Mike’s Models driver and firemen figures painted and fitted. Custom ‘RETIARIUS’ nameplates by Narrow Planet completed the model.

I had the privilege of being able to run this loco on the renowned 009 Cliffhanger layout when I help run it at the Railex NE 2013 exhibition. Here is a little video of it guesting on that layout.
